Unwrapping Azure Bicep: A Festive Peek at Hidden and Experimental Features

Principal Solution Architect, working daily with Azure, primarily focusing on automation and "everything as code".
Introduction
This holiday season, let’s deck the halls of Infrastructure as Code with something a little different! Azure Bicep isn’t just about clean syntax and tidy deployments—it also hides a few surprises under the tree. In this session, we’ll unwrap several lesser-known features (including some experimental ones) that can make your deployments smarter, more flexible, and maybe even a little more joyful.
Think of it as a stocking full of IaC goodies: some features you’ll want to use right away, others you’ll want to keep an eye on for the future. Along the way, we’ll sprinkle in a demo, a dash of humor, and just enough festive cheer to keep even the Grinch interested.
Scenario
Let’s imagine you are working on a new project that aims to implement a new solution that should be deployed to Azure but also “touches” Microsoft Entra and GitHub.
As a regular attendee of Bicep community calls, you’ve learned about several promising features that could help you with this project. This is a great opportunity to test them out.
Configure your environment
Let’s start with the basics; we need to create a new directory and initialize a new git repository for our project.
mkdir festive-tech-calendar-2025
cd festive-tech-calendar-2025
git init
code .

Now we should configure our IDE - my favorite one is Visual Studio Code - for a Bicep project. In practice, we need to create a bicepconfig.json file, typically at the root of our repository. We simply open the Command Palette ([CTRL/CMD]+[SHIFT]+P), select Bicep: Create Bicep Configuration File, and choose, where this file should be stored.
It gives us an initial version of the configuration, but we need to extend it, if we want to use some of the experimental features in our project.
This is how my bicepconfig.json looks initially:
{
  // See https://aka.ms/bicep/config for more information on Bicep configuration options
  // Press CTRL+SPACE at any location to see Intellisense suggestions
  "analyzers": {
    "core": {
      "rules": {
        "no-unused-params": {
          "level": "warning"
        }
      }
    }
  },
  "experimentalFeaturesEnabled": {
    "extensibility": true,
    "extendableParamFiles": true,
    "localDeploy": true,
    "deployCommands": true,
    "userDefinedConstraints": true,
    "sourceMapping": true
  }
}
Not all the features, we will be exploring, have its own flag in experimentalFeaturesEnabled key. Some of the are not even experimental, they are just less known (some of them I would even all ‘hidden gems’).
Scaffold your project with AI
It would feel odd, if this article didn’t mention AI, right? 😁
The first experimental feature we are going to try is Bicep MCP Server. It is included in the Bicep VS Code extension and it provides agentic tools to support Bicep code generation for AI agents in VS Code.
Apart from that VS Code extension, you will also need a GitHub Copilot license. You can enable a free license that has some limitations but it’s still great for experimenting 👍).
With these prereqs in place, open the GitHub Copilot extension window (1) and select "Agent Mode" (2). Then click on the Configure tools… button (3) and ensure that ‘ Bicep (EXPERIMENTAL)‘ category with all four tools is selected (4):

Depending on your preference, you can choose different models (LLMs) like GPT or Claude Sonet. This selection has impact on how your requests are counted towards your quota.
Now we need to give the Copilot (and MCP Server) a meaningful prompt. For our project, I am submitting this one:
Help me create a solution hosted in Azure that will create:
- a Virtual Network with a subnet for Virtual Machines, and a subnet for Azure Bastion.
- a Bastion host (deployed to its dedicated subnet)
- an Azure Virtual Machine based on Windows Server 2025
- a Public Load Balancer that will publish port TCP/80 of that Azure VM to the internet. No other ports should be opened in the Network Security Group.
Create Bicep deployment and follow Bicep best practices. Use Azure Verified Modules as much as possible. Do not create a Bicep parameters file.
This short video shows how GitHub Copilot managed to deal with this task:
We won’t be focusing on every detail of that generated code (and no, the code I got wasn’t perfect, I had to fix a few linter errors), but from the final overview that the agent wrote me it sounds very impressive.
I particularly like how it followed best practices (by using the get_bicep_best_practices tool) and the fact it found applicable AVM modules and used it:

Extend the solution with Microsoft Entra objects
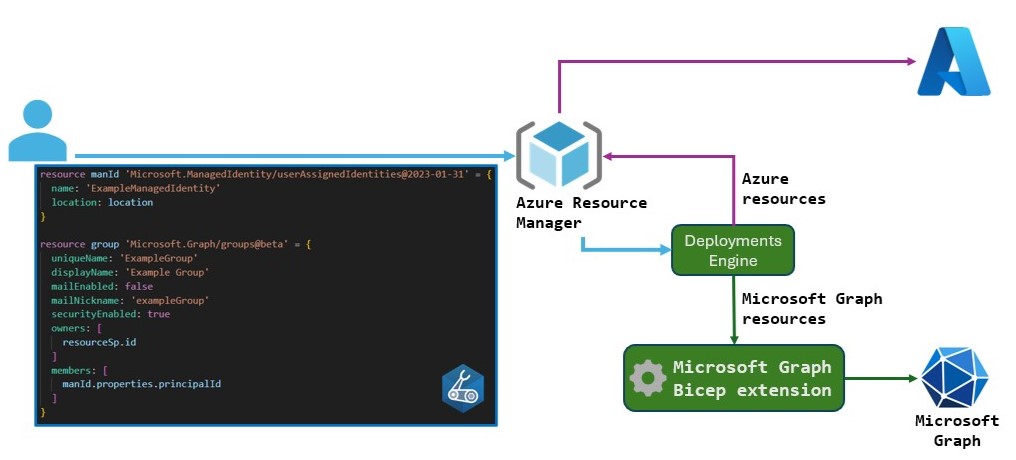
The Microsoft Graph Bicep extension lets you author, deploy, and manage a limited set of Microsoft Entra ID resources in Bicep template files with Azure resources.
Reference: Microsoft Learn
Apart from having the Bicep CLI (v0.36.1+) and the Bicep extension in VS Code (version v0.36.1 or later), I also need to ensure my bicepconfig.json file the following section:
{
  "extensions": {
    "microsoftGraphV1": "br:mcr.microsoft.com/bicep/extensions/microsoftgraph/v1.0:1.0.0"
  }
}
Upsert (a combination of Update and Insert). In addition, MSGraph API was updated to support the alternate key pattern, which handles the issue with client-provided keys (typical for ARM API) and service-provided keys as default in MSGraph. That alternate key is what the user specifies in the Bicep file (e.g., for groups there is a new immutable/read-only uniqueName attribute) while still allowing Entra to generate their own keys (id) for its objects.The list of supported resources:

More information can be found at Microsoft Learn.
Let’s dig in…
You start your bicep file with this statement:
extension microsoftGraphV1
After that, you can continue with familiar resource declaration but you will be using Microsoft.Graph namespace, like in this example:
resource exampleGroup 'Microsoft.Graph/groups@v1.0' = {
  displayName: 'Test Group 1'
  mailEnabled: false
  mailNickname: 'test-group-1'
  securityEnabled: true
  uniqueName: 'testgroup1'
  members: [
    ''
    ''
  ]
}
Remember: uniqueName is an immutable key for that group, meaning you declare it once but you can’t change it afterwards!
You will then run a regular Resource Group-scoped Azure deployment using either Azure CLI (v2.73.0 or later) or Azure PowerShell, which will show in the Deployments history for a given RG. For example, assuming you have signed-in previously with az login and the target RG exists, you will deploy your Bicep file with: az deployment group create --resource-group exampleRG --template-file main.bicep
You need to remember, this deployment will require a set of permissions in both Azure and Entra:
Microsoft Azure role: You need a permission to create a deployment in a given Resource Group. Of course, depending on what Azure resources you want to create in addition to your Entra objects, you need those
Microsoft Entra role: Ensure you have permissions to create objects, e.g., a security group. By default, users have this permission, but admins can restrict it. If restricted, you need at least the Groups Administrator role.
There is a couple of important things to remember:
In case the Entra object you are addressing was created previously, you can reference it using the
existingkeyword, like you do with Azure resources.Sometimes, you can get a failed deployment due to ‘replication delays’. When this happens, just wait briefly, then deploy the same Bicep file again.
When you need to clean up the resources you created, even if the deployment of Graph resources happened in a resource group deployment, you won’t get rid of your Graph objects by deleting the RG. You need to use another method, for example:
az rest --method delete --url 'https://graph.microsoft.com/v1.0/groups%28uniqueName=%27testgroup1%27%29'
Add GitHub resources with Local Deploy
Let’s move on to the next rather exciting experimental feature - Bicep Local Deploy - that can be used to author Bicep files and use Bicep extensions that are designed to run fully locally, without the need for an Azure connection.
This pushes the boundary of Bicep extensibility to a whole new level, because theoretically, we are leaving the realm of Microsoft Cloud and tapping into pretty much any API we could call. And while this is indeed exciting to see (as it unlocks a lot of interesting scenarios), there is a open question that I don’t have answer for: “Is Azure Bicep aspiring to become another multi-cloud DSL like Terraform?”
Let’s put that question aside and focus on the architecture and the typical workflow.
You can either use some existing extension created and published by the community or author your own.
You need to have the
"localDeploy": trueline inside the"experimentalFeaturesEnabled"key in your bicepconfig.json, coupled with the”extension-alias”: “<path_to_binary>”line under the”extensions”:key in the same file. The most common way to publish extensions is via Azure Container Registry, for example:"br:bicepextdemo.azurecr.io/extensions/local:0.1.3"You author a Bicep file (and a parameter file)
You run the deployment, either by using the Deployment Pane in VS Code or via CLI:
bicep local-deploy <path_to_bicepparam_file>. Note that we are not running a regular az deployment command.
For our demo, we want to create a couple of GitHub resources. For that I will be using an extension from Anthony C Martin, one of the software engineers in the ARM Deployments Team at Microsoft. Link to the Anthony’s repo: https://github.com/anthony-c-martin/bicep-ext-github
First, let’s make sure we have the right configuration in place in bicepconfig.json:
{
  "experimentalFeaturesEnabled": {
    "localDeploy": true
  },
  "cloud": {
    "credentialPrecedence": ["AzureCLI"],
    "currentProfile": "AzureCloud"
  },
  "extensions": {
    "github": "br:bicepextdemo.azurecr.io/extensions/github:0.1.10"
  },
  "implicitExtensions": []
}
Then we will use a slightly modified example of the main.bicep template to:
create a new public repository
add a repository variable
Note how we start the config file with targetScope = ‘local’ declaration.
targetScope = 'local'

@secure()
param githubToken string

param owner string
param repoName string

extension github with {
  token: githubToken
}

resource repo 'Repository' = {
  owner: owner
  name: repoName
  description: 'Test bicep repository'
  visibility: 'Public'
}

resource variable 'ActionsVariable' = {
  owner: owner
  repo: repoName
  name: 'MY_VARIABLE'
  value: 'just-another-value'
}

output repo object = repo
output variable object = variable
The main.bicepparam file looks like this:
using 'main.bicep'

param githubToken = readEnvironmentVariable('GITHUB_TOKEN')

param owner = 'pazdedav'
param repoName = 'bicep-local-test-repo'
bicep local-deploy command, you need to get your GitHub token and export it as environment variable. I am using a Mac, so for me it’s export GITHUB_TOKEN=$(gh auth token)My first attempt to deploy failed (I suspect it was the racing condition of adding a variable to a repo that wasn’t created yet), but it succeeded the second time:

Conclusion
Each of these feature could be a topic for a separate blog post and there are many already written (I tried to call out some of them in the Resources section).
I hope this article motivates you to try some of them in your own IaC practice. Just keep in mind that using any of the experimental features in production is a bad idea!

Resources
Here is the list of useful resources you could use to explore these features and capabilities further:
Experimental Features overview (Bicep project on GitHub): https://github.com/Azure/bicep/blob/main/docs/experimental-features.md
Demo of Bicep Local deployment: https://www.youtube.com/watch?v=CiKgf7Tp9Cc&pp=ygUWYmljZXAgbG9jYWwgZGVwbG95bWVudA%3D%3D
Tutorial - Bicep Experimental MCP server tools: https://www.youtube.com/watch?v=LeGpeY1LrBU&pp=ygUSYmljZXAgZXhwZXJpbWVudGFs
Bicep release notes: https://github.com/Azure/bicep/releases
Bicep templates for Microsoft Graph resources: https://learn.microsoft.com/en-us/graph/templates/bicep/overview-bicep-templates-for-graph
Bicep Entra Extensibility - Manage Entra Objects Declaratively (John Savill’s video tutorial): https://www.youtube.com/watch?v=RyCjSp26xXg
Create your own custom extension for Azure Bicep (John Lokerse): https://johnlokerse.dev/2025/10/20/create-your-own-custom-extension-for-azure-bicep/
Build a Custom Extension for Bicep (Maik van der Gaag): https://msftplayground.com/2025/09/bicep-custom-extension
Festive Tech Calendar YouTube channel: